With all my many new French regiments painted and the entire Allied Army's guns remastered during the last three months, the time now has come, to see My Seven Years' War French Army giving battle to My Britannic Majesty's Army in Germany.
 |
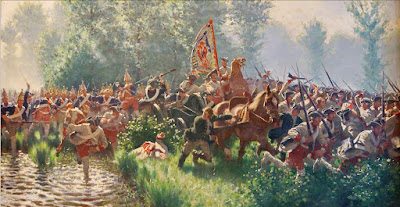
| Untitled painting by Richard Knötel. Collection of the Rastatt Army Museum WGM, Germany. A very biased English sides take on the state of affairs, really. The below will reveal the ‘true’ story. |
Historical Background

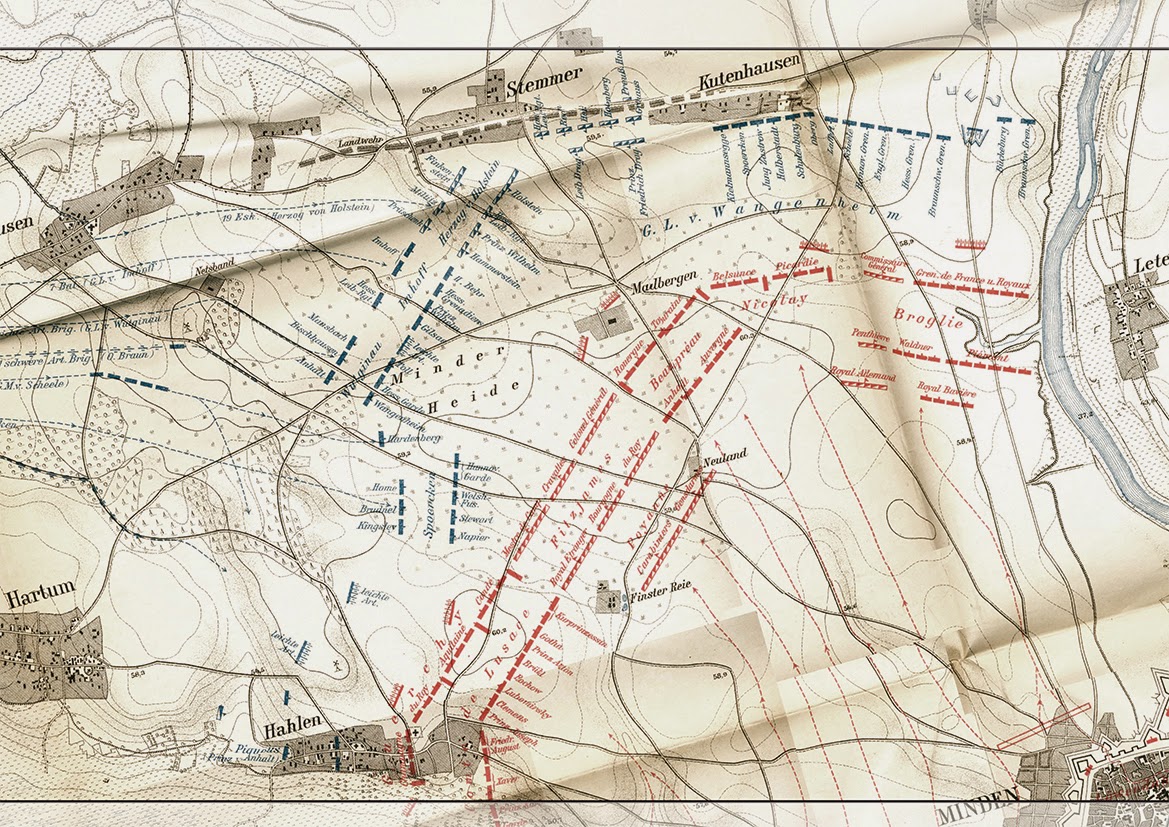
To start with, above sketch shows the historical situation at nighttime 24 June (see the orbats below). The French stole the Allies a march or two, crossed the Ohm river June 24, and set up camp around Niederklein. Ferdinand really wanted to set up his defense of Lower Hesse by taking advantage of the strong Ohm position between Schweinsberg and Homberg, but entirely screwed it. Despite the warnings of his forward elements placed along the Ohm, he was unwilling to advance from his camp near Fritzlar. He did so only at 01.30h June 24. Too late, as during the afternoon that day, the French pushed back all Allied advance troops and crossed the river. Only now Ferdinand realized matters became serious - Broglie was about to spoil his entire campaign planing. He now ordered the army to continue marching all the way to Neustadt, where it arrived at midnight all exhausted, having covered a distance traced out for two marches of 5.5 German miles in 24 hours (approx. 41 km). Also the Erbprince's force had spent most of the two last days force marching to join general Imhoff's pressed force at Amöneburg. Broglie was found with most of his force already across the river, and had all approaches well guarded by his forward light troops, while most of Ferdinand's troops were seen exhausted spitting along the roadsides between Neustadt and Erxdoff.
Now, at this point I decided to alter the historic situation. I assume Ferdinand had stepped off his Camp of Fritzlar 1 or 2 days earlier and was found in Neustadt well rested and prepared to give battle June 25 or 26. Lusace's reserve of the right was still found encamped between Haarhausen and Homberg on the left bank of the Ohm - historically, he formed up on the right of Broglie near Kirtorf (Kirchdorff with above map) June 25.
Historically, Ferdinand gave up his idea to attack, but withdrew to a position behind the Schwalm river June 26. In fear of being attacked by the French in his Neustadt position June 26, he formed up his army which had to spend the night under arms in the open. Oddly enough, also Broglie feared to be attacked and ordered his entire army to form up in line of battle on the morning 26 June. Also Ferdinand would have been more determined then he really was. That's all it takes to arrive at the desired epic battle.
My Volley & Bayonet Scenario
As a result of limited table size, I doubled distances and round about halved the original Army's troop strength. The French had amassed about a 100.000 men opposing about 55.000 Allies. They would all fit onto my table, but I thought it would have become too crowded allowing for but little maneuvering. Now, a regiment would represent a brigade and the battlefield measured a more spacey 18.000 by 11.400 Yards. The forces engaged can be seen on my two below orbat sheets. They are the breakdown of the historic orders of battle for this day. I have of course inserted my units here. To my delight, a many are really authentic. Most obvious, it is the historic Saxons with Lusace's corps that are missing. They will yet have to be painted. For the time being, they had been substituted by my more then worthy Bavarians - tested comrades-in-arms of the French, anyway.
As a result of limited table size, I doubled distances and round about halved the original Army's troop strength. The French had amassed about a 100.000 men opposing about 55.000 Allies. They would all fit onto my table, but I thought it would have become too crowded allowing for but little maneuvering. Now, a regiment would represent a brigade and the battlefield measured a more spacey 18.000 by 11.400 Yards. The forces engaged can be seen on my two below orbat sheets. They are the breakdown of the historic orders of battle for this day. I have of course inserted my units here. To my delight, a many are really authentic. Most obvious, it is the historic Saxons with Lusace's corps that are missing. They will yet have to be painted. For the time being, they had been substituted by my more then worthy Bavarians - tested comrades-in-arms of the French, anyway.


Anyone familiar with the rules will notice my French army is rated a somewhat better fighting force than in the usual orbats for the SYW French. Also the Allies have been given a good number of morale 6 units combined with a rather high division exhaustion.
With our game the attacking Allies were free to choose the battlefield area according to their plan of attack. All woods were rather open and passable for all arms. The numerous runs found here had no marshy banks except for the run around Blasdorff bridge on the French left. The Ohm river was passable only at the bridges. One at Amöneburg, another one at Homberg, plus the three pontoon bridges the French jetted across the Ohm the other day.
The Allies decided to attack the French left, and the battlefield was set up accordingly. Ferdinand decided that Imhoff and the Erbprinz were to fall upon the French left, while Ferdinand's main force was to attack frontally right through the woods separating both armies between Allendorf and Niederklein to exert as much pressure as possible. His cavalry wings of Granby and Oheimb were combined on the left, where the terrain was found more open. Accordingly, as part of the pre-battle off table movement, the Erbprinz deployed behind Imhoff. The latter was to seize and secure the passages around Blasdorff bridge at daybreak prior to the arrival of the Erbprinz, who was to execute the principal attack turning the French left wing and dislodge the French from the heights of Niederklein.
To the first alarm, the French formed up in order of battle with Lusace still on the far bank of the Ohm. It would take him some time to arrive on the scene. The army was determined to defend its position and beat off the Allied attack. Condé's avantgardes were spread across the front. Blaisel's volontaires de Clermont had occupied Kirchdorff. His converged elites of the infantry were initially encamped ahead of the first line around the small village of Lehrbach behind a run with the same name.
The Battle
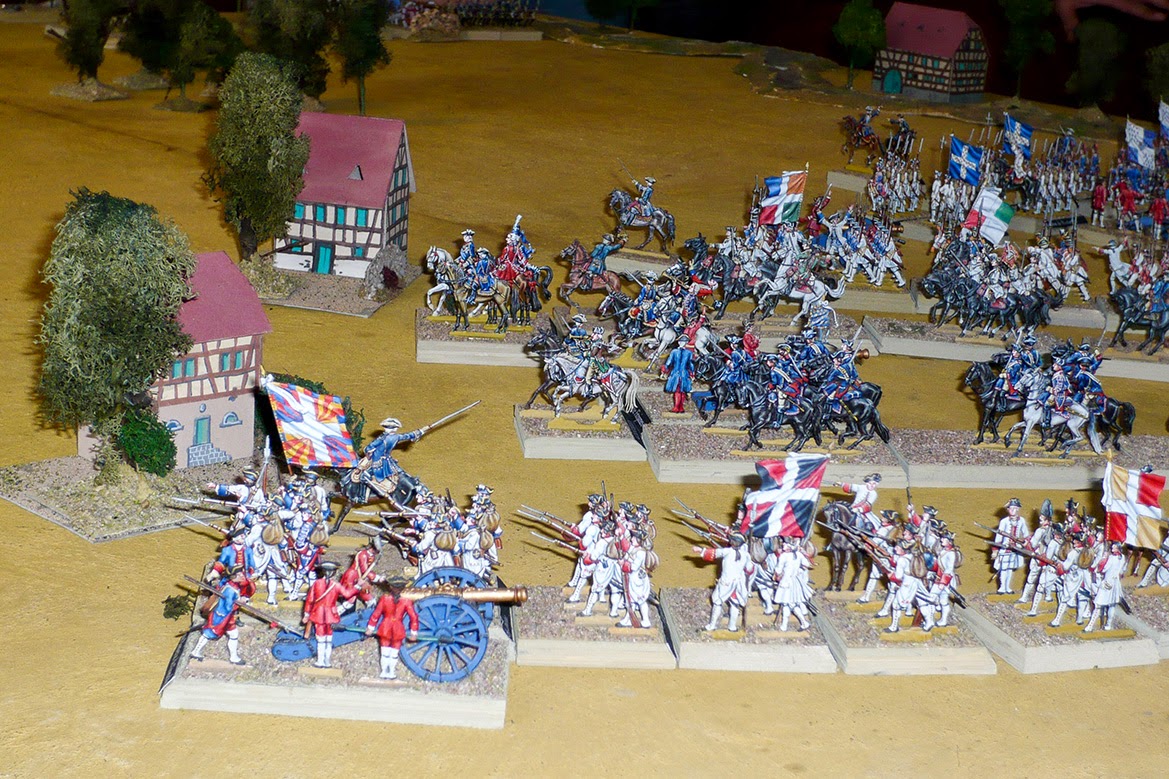
![]() View across the front of the deployed French army. Foreground shows the cavalry of the right and the 1st Infanterie division under d'Havré deployed to the right of the village of Dannenrod. Next to the castle of Schweinsberg (centre left) you see the Carabiniers and the heavy artillerie park awaiting orders as to where they should reinforce the French position.
View across the front of the deployed French army. Foreground shows the cavalry of the right and the 1st Infanterie division under d'Havré deployed to the right of the village of Dannenrod. Next to the castle of Schweinsberg (centre left) you see the Carabiniers and the heavy artillerie park awaiting orders as to where they should reinforce the French position.
![]() View of the French left deployed between Niederklein and the Allies held crossing of the Netzebach at Blasdorff Bridge were you see Imhoff's Light's already in position. Imhoff screens the approaching column of the crack division under command of the Erbprinz. You can also see Ferdinand's main force advancing trough the open woods separating both armies in their front. Note the body of horse seen at the upper left edge of the table. That is Granby's Cavalerie of the Right. It seems none of Ferdinand's aide-de-camps had issued any orders to him. While the rest of the army is found in full motion, the poor man is halting and waiting for someone to tell him what to do. Oddly enough, Ferdinand opted for the French left to be turned, the single area where the heights of Niederklein were most difficult to access. In the event, the area around Blasdorff became the scene of the hottest fighting. ‘Blasdorff Bridge’ – a location reminding me of Young & Lawford's scenario of ‘Blasthof Bridge’ in their classic 1967 published Charge! Or how to play Wargames. I wonder if there was an intended connection? Really, much of the northern section of the battlefield was the scene of the popular action of Emsdorf, fought 15 July 1760. With my old map, all those ‘…dorff’ places are found in the old German reading with double ‘f’. Nowadays, its just one. Historically, it was general Glaubitz force which finally surrendered around Niederklein. It would have been the regiment/brigade of Anhalt, part of Lusace's Corps with my above orbat – but ‘nay’ – not today!
View of the French left deployed between Niederklein and the Allies held crossing of the Netzebach at Blasdorff Bridge were you see Imhoff's Light's already in position. Imhoff screens the approaching column of the crack division under command of the Erbprinz. You can also see Ferdinand's main force advancing trough the open woods separating both armies in their front. Note the body of horse seen at the upper left edge of the table. That is Granby's Cavalerie of the Right. It seems none of Ferdinand's aide-de-camps had issued any orders to him. While the rest of the army is found in full motion, the poor man is halting and waiting for someone to tell him what to do. Oddly enough, Ferdinand opted for the French left to be turned, the single area where the heights of Niederklein were most difficult to access. In the event, the area around Blasdorff became the scene of the hottest fighting. ‘Blasdorff Bridge’ – a location reminding me of Young & Lawford's scenario of ‘Blasthof Bridge’ in their classic 1967 published Charge! Or how to play Wargames. I wonder if there was an intended connection? Really, much of the northern section of the battlefield was the scene of the popular action of Emsdorf, fought 15 July 1760. With my old map, all those ‘…dorff’ places are found in the old German reading with double ‘f’. Nowadays, its just one. Historically, it was general Glaubitz force which finally surrendered around Niederklein. It would have been the regiment/brigade of Anhalt, part of Lusace's Corps with my above orbat – but ‘nay’ – not today!
![]() The French decided for a forward defense and denied the Allies the crossing for a considerable time.
The French decided for a forward defense and denied the Allies the crossing for a considerable time.
The regiment of Auvergne defended the crossing with utmost bravery, anticipating its historical brave fight at Klosterkamp. More decisive, I was told from English prisoner officers, it was Guerchy's battery that spit terror and carnage among the attacking Allies.
![]() Hardly one of its devastating canister brooms missed its target. It was too much for the Erbprinz.
Hardly one of its devastating canister brooms missed its target. It was too much for the Erbprinz.
In the centre around Niederklein, general Rooth's division descended from their hill and engaged the division of Wangenheim.
![]() To my Irish brigade as well as to my recently painted Aquitaine, this was to be their first test of battle.
To my Irish brigade as well as to my recently painted Aquitaine, this was to be their first test of battle.
The regiments fought well. The Irish had the misfortune to have colonel Huth's Hessian heavy 12-pounders right to their front. It killed them rather soon. Aquitaine performed marvelously. Sustaining a heavy fire, it refused to give way, though, the division was soon found exhausted.
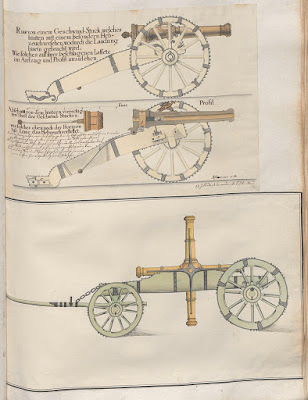
![]() Here have a view of the Hessian 12-pdr. Scratch built around last Christmas, with dimensions based on original source. A Prussian Brummer-class heavy battery piece. Only when Wutginau's Hessian division started to outflank Aquitaine and Condé – all that remained from Rooth's division – it withdrew back to the highgrounds along with Condé, but not before they succeeded in knocking out the Hannoverian regiment of Hardenberg. Can't believe the two really exchanged fire, as I longed for at the bottom of my previous article "My Way to paint 30 mm ‘Flat’ Miniatures – Might serve as a Tutorial". I swear to Mars, this isn't scripted reality here. They really opposed another – and Aquitaine won. Hah! What a fine regiment it is.
Here have a view of the Hessian 12-pdr. Scratch built around last Christmas, with dimensions based on original source. A Prussian Brummer-class heavy battery piece. Only when Wutginau's Hessian division started to outflank Aquitaine and Condé – all that remained from Rooth's division – it withdrew back to the highgrounds along with Condé, but not before they succeeded in knocking out the Hannoverian regiment of Hardenberg. Can't believe the two really exchanged fire, as I longed for at the bottom of my previous article "My Way to paint 30 mm ‘Flat’ Miniatures – Might serve as a Tutorial". I swear to Mars, this isn't scripted reality here. They really opposed another – and Aquitaine won. Hah! What a fine regiment it is.
Now back to the events. This fight delayed the centre of the Allies to cross the Klein run for a while. Further to the French right, Blaisel's Lights and the Cavalerie of the Right, denied the Allies any significant progress with a number of smart moves.
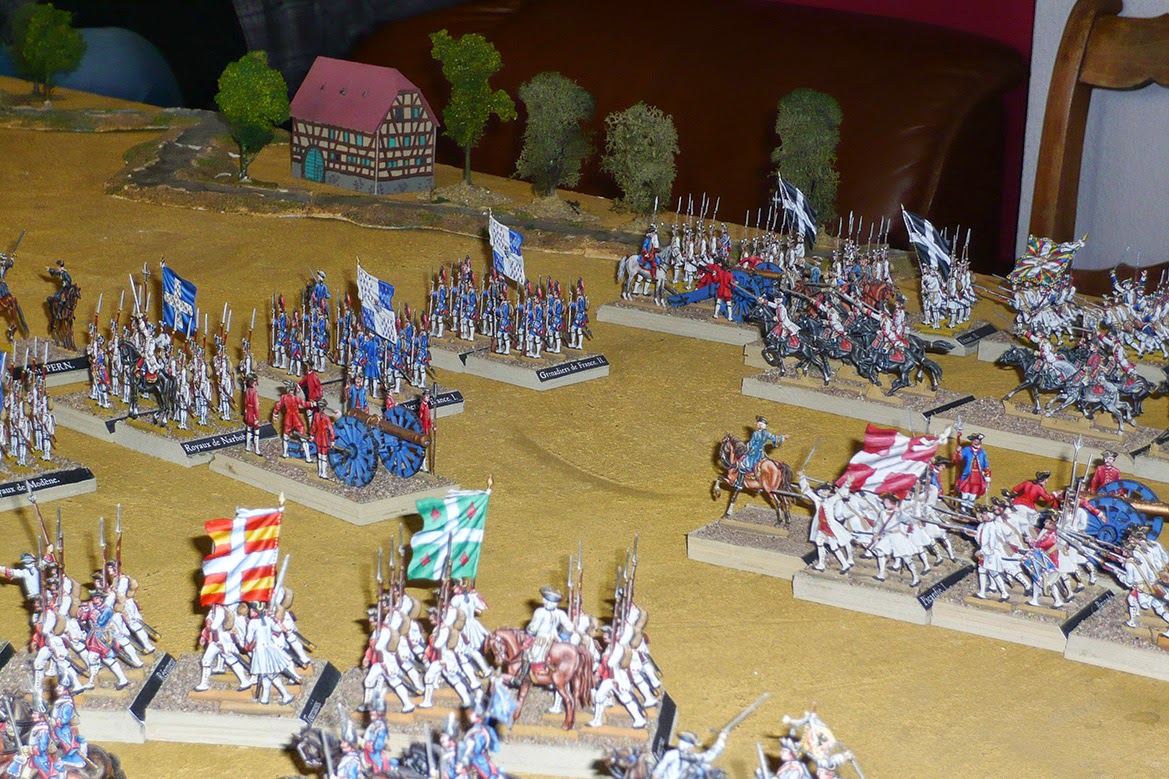
![]() View of the situation on the French right. 1) is Blaisel's avantgarde at Krichdorff, 2) is Condé's Grenadiers & Chasseurs of the Army, 3) is Lusace's Corps at Homberg. With Granby's cavalerie delayed arrival, Oheimb's cavalerie of the Left tried to open a path for the Allies on the French right on their own, but were repulsed by the joint counterattack of Lusace's arriving escadrons as well as the Carabiniers. The latter had concealed themselves on the high ground behind the infanterie around Niederklein, by taking advantage of my flats rather slim sillhouette. My Opponent failed to identify them as cavalry and in the event, his horse was caught in flank by the Carabiniers smart timed counterattack. That day, the regiment anticipated what is known as ‘hull down’ position in modern armoured warfare. Make it the French invention ‘horse down’ position for cavalry in the SYW. Worked out charmingly.
View of the situation on the French right. 1) is Blaisel's avantgarde at Krichdorff, 2) is Condé's Grenadiers & Chasseurs of the Army, 3) is Lusace's Corps at Homberg. With Granby's cavalerie delayed arrival, Oheimb's cavalerie of the Left tried to open a path for the Allies on the French right on their own, but were repulsed by the joint counterattack of Lusace's arriving escadrons as well as the Carabiniers. The latter had concealed themselves on the high ground behind the infanterie around Niederklein, by taking advantage of my flats rather slim sillhouette. My Opponent failed to identify them as cavalry and in the event, his horse was caught in flank by the Carabiniers smart timed counterattack. That day, the regiment anticipated what is known as ‘hull down’ position in modern armoured warfare. Make it the French invention ‘horse down’ position for cavalry in the SYW. Worked out charmingly.
![]() It gained the French right wing all the time needed for Lusace to pass the Ohm at Homberg and march his force straight in the direction of Kirchdorff into an outflanking position. Only after Lusace had deployed along the Lehrbach, Granby's cavalry finally appeared on the scene. But by this time, Oheimb's cavalry was already found defeated and Wutginau's division was the sole intact body of troops around. Too few to deal with the entire French right wing plus Lusace's Corps.
It gained the French right wing all the time needed for Lusace to pass the Ohm at Homberg and march his force straight in the direction of Kirchdorff into an outflanking position. Only after Lusace had deployed along the Lehrbach, Granby's cavalry finally appeared on the scene. But by this time, Oheimb's cavalry was already found defeated and Wutginau's division was the sole intact body of troops around. Too few to deal with the entire French right wing plus Lusace's Corps.
![]()
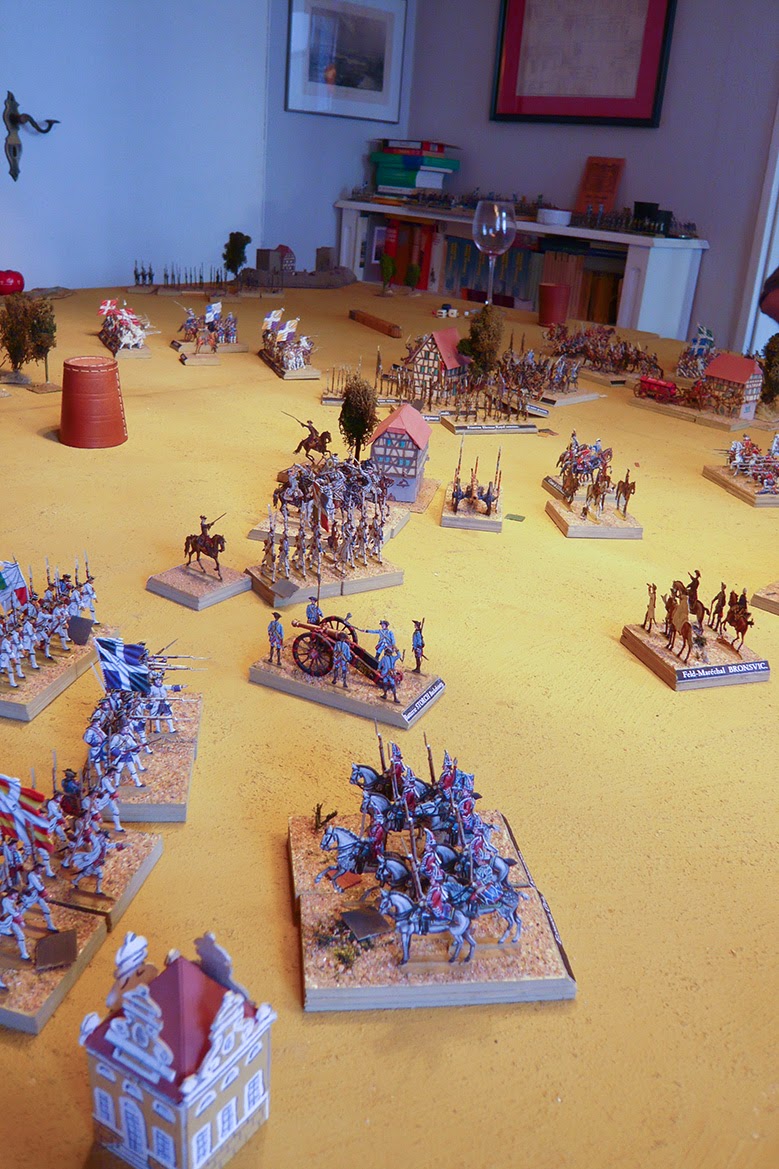
Above image shows the final stage on the French right. Granby's horse is denied to turn the French flank, and Lusaces grenadiers actually dare to close in and pur in their fire. Wutginau's attack on d'Haré's division was repulsed and its remains were now shattered by the French right wing cavalry.
Returning to the more intense fighting around Blasdorff Bridge now. With considerable loss, the Allies finally managed to crush the French defenders, that had to be relieved by St. Perns Grenadiers. This Corps d'élite didn't perform all that well. By some sort of misunderstanding it was found deployed with exposed flanks. The Erbprinz saw his chance, attacked with all what was left and routed the entire division in a single onslaught. Now the Allied army was found completely worn down, while the crisis on the French left could be recovered by the arrival of Condé's grenadiers, as well as with the now engaging French cavalerie of the Left. It was too much for the Allies. The battle was lost. Granby's cavalry was found the single body, that had not been committed. An aide-de-camp of Lusace could clearly see Granby throwing his wig into the Lehrbach in a blaze of anger.
He could do no more then cover the retreat of Ferdinand's utterly defeated army.
The Allies – Its an Original. Source is the Paris Service Historique de l'Armée de Terre at Château Vincenne. Apparently, it was captured – from Granby's staff ?… . First sheet has the Main Army, the second the detached and advance troops and their locations June 25.
![]()
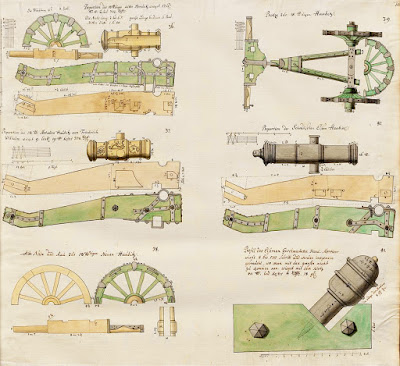
Above see an incomplete sketch of the French Camp of Schweinsberg. The woods are way too extended. That's because this terrain was held by the Allies then, and as a result, could not be reconnoitred. This type of plans was standard staff work at that time and would have been done with each camp. The colouring was done later, of course. Also the Klein run to the north of the camp is missing. Only the left half of the army is illustrated. The entire right is missing ?!?.
![]()
![]()
![]()
The French Army's order of Battle June 1760.
St. Germain's army of the Lower Rhine has to be ignored here.
This order of battle makes a dead on match with all the records. The troops not present at Schweinsberg June 25/26 were the Gendarmerie, that was still approaching, the cavalry brigade of Orléans, which was located at Limburg June 23 and joined only after June 27. Also Chabot's Avantgarde including some line troops he had under his command I have not accounted for. They should have been found located at Amöneburg and some other locations between Amöneburg and Marburg monitoring the left flank of Broglie's army.
The Battle


The regiment of Auvergne defended the crossing with utmost bravery, anticipating its historical brave fight at Klosterkamp. More decisive, I was told from English prisoner officers, it was Guerchy's battery that spit terror and carnage among the attacking Allies.

In the centre around Niederklein, general Rooth's division descended from their hill and engaged the division of Wangenheim.

The regiments fought well. The Irish had the misfortune to have colonel Huth's Hessian heavy 12-pounders right to their front. It killed them rather soon. Aquitaine performed marvelously. Sustaining a heavy fire, it refused to give way, though, the division was soon found exhausted.

Now back to the events. This fight delayed the centre of the Allies to cross the Klein run for a while. Further to the French right, Blaisel's Lights and the Cavalerie of the Right, denied the Allies any significant progress with a number of smart moves.


Above image shows the final stage on the French right. Granby's horse is denied to turn the French flank, and Lusaces grenadiers actually dare to close in and pur in their fire. Wutginau's attack on d'Haré's division was repulsed and its remains were now shattered by the French right wing cavalry.
Returning to the more intense fighting around Blasdorff Bridge now. With considerable loss, the Allies finally managed to crush the French defenders, that had to be relieved by St. Perns Grenadiers. This Corps d'élite didn't perform all that well. By some sort of misunderstanding it was found deployed with exposed flanks. The Erbprinz saw his chance, attacked with all what was left and routed the entire division in a single onslaught. Now the Allied army was found completely worn down, while the crisis on the French left could be recovered by the arrival of Condé's grenadiers, as well as with the now engaging French cavalerie of the Left. It was too much for the Allies. The battle was lost. Granby's cavalry was found the single body, that had not been committed. An aide-de-camp of Lusace could clearly see Granby throwing his wig into the Lehrbach in a blaze of anger.
He could do no more then cover the retreat of Ferdinand's utterly defeated army.
Appendix
Below I've added the historic battle orders, for anyone interested to prepare this scenario based on his own employed scales and ruleset.The Allies – Its an Original. Source is the Paris Service Historique de l'Armée de Terre at Château Vincenne. Apparently, it was captured – from Granby's staff ?… . First sheet has the Main Army, the second the detached and advance troops and their locations June 25.

 |
| Copyright restricted image – It is published here for purely academic use without any commercial intention. |
 |
Copyright restricted image – It is published here for purely academic use without any commercial intention. © 2014 DigAM - digitales archiv marburg / Hessisches Staatsarchiv Marburg, http://www.digam.net/?dok=5197 |
Above see an incomplete sketch of the French Camp of Schweinsberg. The woods are way too extended. That's because this terrain was held by the Allies then, and as a result, could not be reconnoitred. This type of plans was standard staff work at that time and would have been done with each camp. The colouring was done later, of course. Also the Klein run to the north of the camp is missing. Only the left half of the army is illustrated. The entire right is missing ?!?.


The French Army's order of Battle June 1760.
St. Germain's army of the Lower Rhine has to be ignored here.
This order of battle makes a dead on match with all the records. The troops not present at Schweinsberg June 25/26 were the Gendarmerie, that was still approaching, the cavalry brigade of Orléans, which was located at Limburg June 23 and joined only after June 27. Also Chabot's Avantgarde including some line troops he had under his command I have not accounted for. They should have been found located at Amöneburg and some other locations between Amöneburg and Marburg monitoring the left flank of Broglie's army.